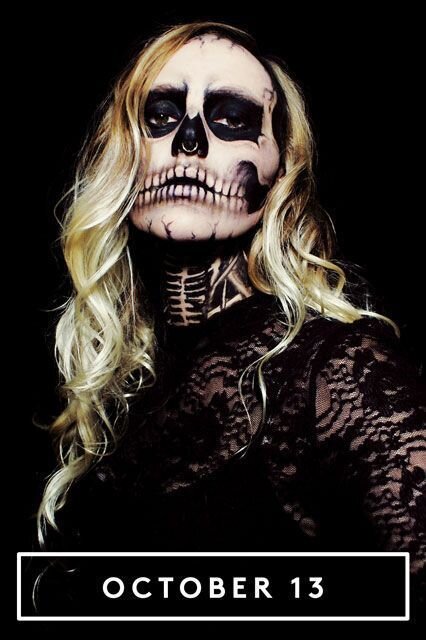
Skeleton Skull Makeup Process | Halloween in SoCal!
The Saturday before Halloween, Peter and I got all spooked-out dressed up as skeletons.
Halloween 2017 fell on a Tuesday this year, so “Halloweekend” was widely celebrated the weekend before. Our full-face skeleton makeup turned out exceptionally, if I may say so myself. In this video and blog post I will share the entire process of how the look was created so that others might be inspired as I was.
Table of Contents Show
After our transformation, we hit up a few of the local, cool bars in Southern California’s Costa Mesa that were holding Halloween parties. Creating the makeup look may have been tedious, but creeping people out all night with our ghoulish glares completely made it worth the time and effort! Not to mention how cool we looked. Just sayin’. So sit back, grab the bowl of leftover candy from Halloween, and allow me to confide in you the process behind this spooky look and join us in our night out on the town celebrating Halloween 2017!
Skeleton Makeup
After just moving across the country to our new home in SoCal, Peter and I were looking not to spend too much money on this year’s Halloween costumes. So we decided to go as spooky skeletons. Instead of paying big bucks for extravagant costumes with all the bells and whistles, we could look just as cool by buying black and white face makeup and contacts! Then I could use my creative abilities to transform us into creepy ghoulies.
So if you’re also looking for a cheap and incredibly spooky Halloween costume – this is the tutorial for you! Or hey, maybe it’s not for Halloween. Maybe you just want to look like a Skeleton or Grim Reaper for fun. Who am I to judge. And despite how awesome it looks, it was surprisingly easy. If I could do it, so can you!
I’m not going to pretend to be any kind of professional makeup artist, but I am seriously proud of how our skeleton makeup turned out. It was a bit of a gamble because I am way too lazy of a person to practice ahead of time. After watching a couple YouTube video tutorials and saving some reference pictures from Google, I began the transformation. Watch the video to see the step-by-step process of how I achieved the look from scratch!
This post contains affiliate links, which means that if you make a purchase through one of these links we will receive a small commission at no extra cost to you, helping to fund our future travels. For more information, read our Disclosures page.
Materials Used:
Urban Decay Black Eyeliner Pot
Mehron Makeup Paradise AQ Face & Body Paint in White
Mehron Makeup Paradise AQ Face & Body Paint in Black
Urban Decay Naked Smoky Palette
Kat Von D Black Tattoo Liner
Mehron Makeup Ultra Fine Setting Powder
Twilight Eclipse White – Luna Eclipse Halloween Contact Lenses from Top Color Contacts
All black outfits that we already had!
Process:
1. PICK A REFERENCE IMAGE.
Before you even begin to think about putting any makeup on your face, you need to have a reference image to work from. Unless you have a photographic memory and now exactly what a skull looks like. There are a lot of different styles to consider as well – you could make it as anatomically correct as possible, or you could make something a little more stylistic. The YouTube video that I first watched to get inspired from and know where to start was actually a Grim Reaper Tutorial for example. You can check it out if you’d like: Shonagh Scott’s Grim Reaper Tutorial. Here is the image that I primarily drew from during this entire process. I wish I could credit someone for it, but I just found the image on Pinterest. (If this is yours, please let me know so I can give you credit!)
2. OUTLINE THE SKULL SHAPE.
Begin your spooky skeleton makeup by making a loose outline of the skull shape on your face. I used my Urban Decay eyeliner pot with a detail brush because I knew it would make a softer line than a felt-tip eyeliner. We want these lines to be somewhat soft and loose because we’ll be painting over them. You could even use an eyeliner pencil or crayon for this. Specifically, try to use the outlines to mark the separation between the areas that will be black and white to help you fill them in later.
3. FILL IN THE OUTLINE WITH WHITE.
Now it’s time to fill in the outlined areas with your face paint. Using the Mehron Paradise AQ Face & Body paint in White, fill in all of the areas of the skull that will be, well, white. The tutorial I watched before starting used an expensive, professional face paint palette that I wasn’t about to invest in. So after some research and combing through Amazon reviews, I found this Mehron paint highly recommended and only about $10-$15. Keep in mind that the paint is water activated! That confused us for a moment when we first started… Don’t get it too watery or it will be runny, you just want it enough to be creamy. Don’t forget to do the neck as well if it will be showing for your costume.
4. DO A SECOND LAYER OF WHITE PAINT.
Wait for the first layer of white to dry. Once it as fully dried, go ahead and and recover everything that you just painted with a second layer of white. The first layer that you do is bound to be somewhat patchy and thin. This second layer just helps the coat look more even and opaque.
5. FILL IN THE REMAINING OUTLINES IN BLACK.
After finishing your coverage of white, you can now go in to the remaining outlined areas to fill with the Mehron Black paint. If you happen to accidentally go over the white areas at all it may mix to create a grey color. But this can be easily repainted over once it has dried. You can try different sized brushes and detail brushes to fill in the smaller areas, like the nose and eye sockets. It’s really up to you and your desired end result what all you do here. We even covered our ears in black. For us it wasn’t necessary to do a second layer of the black paint since it was already very opaque, but feel free to do so if needed after the first layer has dried.
6. DRAW DETAILS WITH BLACK EYELINER.
With the black and white base coverage in place, you can start to get to make it more realistic by drawing on the details. I used Kat Von D’s Tattoo Liner in Black to draw on the teeth and various cracks and fractures in the skull to make it look more realistic. I felt a little bad using my high-end eyeliner on top of the white face paint, but it didn’t end up transferring to the eyeliner tip or affecting it at all! So not to fear, good job Mehron. Once again, these details can really vary depending on the look you’re going for so make sure to refer to your reference images to see what style you like.
7. BEGIN SHADING!
This is where the look really starts to come together. I used the Urban Decay Naked Smoky Palette black and grey colors to shade with, but I’m sure you could use any black and grey eyeshadows to achieve the same effect. Beginning with the shade Black Market, I filled in the far sides of the teeth area and blended them out with a large blending brush to really make the cheek look sunken in like a realistic skull. I added shading around the sides of the skull, around the teeth with a smaller blending brush to make them “pop”, and in the neck pieces to add depth. Shading adds a lot of dimension and realism to your skeleton makeup. This is really where the difference is made between rudimentary style makeup with stark black and white paint and a professional, detailed makeup look.
8. FINAL CHECK & SET THE MAKEUP LOOK.
You’re almost done! Now look your skeleton makeup over and add any final touches as needed. I went back in with my eyeliner to add some extra cracks on the skull to make them look more creepy. Once you’re completely happy with your makeup, you can set the look so that it may last all night through all of your Halloween festivities. After reading good reviews and because it was the same brand as my face paint, I used Mehron Ultra Fine Setting Powder. Using my largest, fluffiest makeup brush (there’s probably a name for this – but remember, I’m not a makeup artist) I applied a thin layer of the setting powder over the entire look.
9. OPTIONAL: PUT IN YOUR CONTACTS.
To add an extra level of spookiness to this skeleton look, you can get some costume contacts! There are a ton of different options that would pair well with this skeleton makeup like all black, white, icy blue, fiery red – it all depends on what look you’re going for. We ordered all white ones (they ended up looking ever so slightly light blue) with black edges online for about $15 a pair. Some people recommend putting the colored contacts in before beginning the makeup look, but I chose to do it afterward because I was worried about any powder or paint getting into the contacts and irritating our eyes before the night has even begun. And I figured if our eyes watered and smudged the makeup at all while putting in the contacts it would be a quick fix with all of the makeup still strewn across our bathroom counter…
10. PUT SOME CLOTHES ON.
Complete the look with an all black outfit of your choosing. We just used what we had in our closets since the objective was to not spend much on this costume idea. If you don’t have an all black outfit to use, try looking for black basics at Forever21 or H&M for something cheap. Walla! It’s a good idea to put your outfit on last so that you don’t accidentally get any paint on it during the makeup process. Your skeleton costume is complete. Go be spooky.
Total time:
First time – 2 hours
Second time – 1 hour
Halloween Parties in Costa Mesa, CA
Since we just moved to California a month ago, we didn’t really know what the “it” spots would be for Halloween. We decided we would wing it and bar hop whatever places caught our fancy. This ended up being a ton of fun! Despite the fact that it was already 11pm because our makeup took longer than anticipated, we hit a couple of very hip bars in the area that were all decked out for Halloween and packed with people dressed in their Halloween best.
Casa
Peter had gone to a really cool bar in Costa Mesa called Casa a couple weeks prior while I was in Japan, and like most bars on this Halloweekend Saturday it was having a Halloween party. It also looked like the area had some other cool places around it within walking distance we could jump to if we so desired. So we called an Uber and were on our way. As we suspected, the Uber driver told us that they had been busy all night carting costume-clad party goers all around town.
Casa was just as cool as Peter had described, a well-decorated, intimate bar with a small dance floor in the back. A movie was projected up against the back wall and a DJ and live music worked together to fill the space with beats you couldn’t resist but to dance to. We sat at a small table near the door, drinking one of the Halloween special cocktails. Every person that entered the bar had no choice but to walk past our table, so we did our best to look sullen and foreboding in our dark corner in the hopes that one of the patrons might look our way. We successfully creeped out a number of people making their way in and out of the bar. Eventually we cut through the tight crowd to the small dance floor in the back for a couple of songs before continuing our night out.
The Wayfarer
In our searchings for Halloween parties in the area that might entice us to attend, we noticed that The Wayfarer was throwing its own “Day of the Corpses” celebration. How fitting of a couple of bony skeleton corpses like ourselves. It was meant to be when we realized that this bar was just a short walk across the street from Casa. We made our way to the entrance, paid the $10 cover, and entered into the spacious bar absolutely filled with various ghosts and ghouls – everyone was dressed in elaborate Halloween costumes of all shapes, sizes, and styles. String lights adorned the ceiling and old scary movies played from large monitors on the walls.
After a couple more drinks to get us into the groove, we squeezed through the crowd to the dance floor. Light flashed hypnotically red, blue, and green, and the music blared a mixture of Halloween favorites and Top Hits. It was hard not to dance our hearts out. We ended the night with a total of 12 individual compliments on our costumes and 2 free shots from a bartender! A successful night to say the least.
Halloween Day
Having partied our hearts out just a few days before, and because it was a Tuesday and we’re old people, Peter and I opted to stay in for Halloween Day. We made our favorite – pineapple, ham, and jalapeño pizza – and topped it off with all of the candy our hearts desired.
Now that we’re adults who can’t go trick or treating, we have to buy the candy ourselves. Our purchases included sour gummy worms, Skittles, chocolate covered pretzels, a king size Reese’s, and a bag of fun size Snickers. Peter had never seen The Sixth Sense (but unfortunately already knew the ending), so we watched it while stuffing our faces. Then we watched a movie neither of us had seen but had heard good things about, Oculus. The movie was surprisingly good and we were both creeped out for the rest of the night. It turned out that we were over ambitious with our candy horde.
By the end of the night our stomachs ached and we had only eaten about half of the candy. We’ve been enjoying the rest all week! So much for our cheat “day”. Nonetheless, a perfect way to complete the Halloween festivities.
What did you do for Halloween? Did you try the Skeleton makeup?
Thank you as always for taking the time to visit my blog! I hope that if you were looking for a Skeleton or Skull makeup tutorial that this was helpful for you and that you had some fun joining us for our night out showing off our spooky makeup for Halloween.
I also hope you enjoyed the YouTube video – I spent way too much time on the titles trying to get it to look like Stranger Things… yeah, we binge-watched the new second season in two days. No regrets. So give it a “thumbs up” and please subscribe to our YouTube channel if you’re not already! If you enjoyed this blog post or know someone else who might find it useful, please use the social icons at the bottom to share this post. You can also use the image below to Pin it to Pinterest and save it for later!
What did you dress up as for Halloween this year? Did you do anything fun and spooky? Tell me in the comments below!
Pinterest image